
Jupyter MCP 服务
通过模型上下文协议启用与 Jupyter 笔记本的交互,支持在 JupyterLab 环境中执行代码和插入 markdown。
MCP 服务配置
复制以下 JSON 到 OPClaw 或其他 MCP 客户端的配置文件中即可使用
{
  "mcpServers": {
    "jupyter": {
      "args": [
        "run",
        "-i",
        "--rm",
        "-e",
        "ROOM_URL",
        "-e",
        "ROOM_TOKEN",
        "-e",
        "ROOM_ID",
        "-e",
        "RUNTIME_URL",
        "-e",
        "RUNTIME_TOKEN",
        "--network=host",
        "datalayer/jupyter-mcp-server:latest"
      ],
      "command": "docker",
      "env": {
        "ROOM_ID": "notebook.ipynb",
        "ROOM_TOKEN": "MY_TOKEN",
        "ROOM_URL": "http://localhost:8888",
        "RUNTIME_TOKEN": "MY_TOKEN",
        "RUNTIME_URL": "http://localhost:8888"
      }
    }
  }
}该服务需要配置环境变量:NOTEBOOK_PATH、SERVER_URL、TOKEN
服务介绍


🪐 ✨ Jupyter MCP 服务器


Jupyter MCP 服务器是一个 模型上下文协议 (MCP) 服务器实现,它提供了与运行在任何 JupyterLab 中的 📓 Jupyter 笔记本的交互(也适用于你的 💻 本地 JupyterLab)。
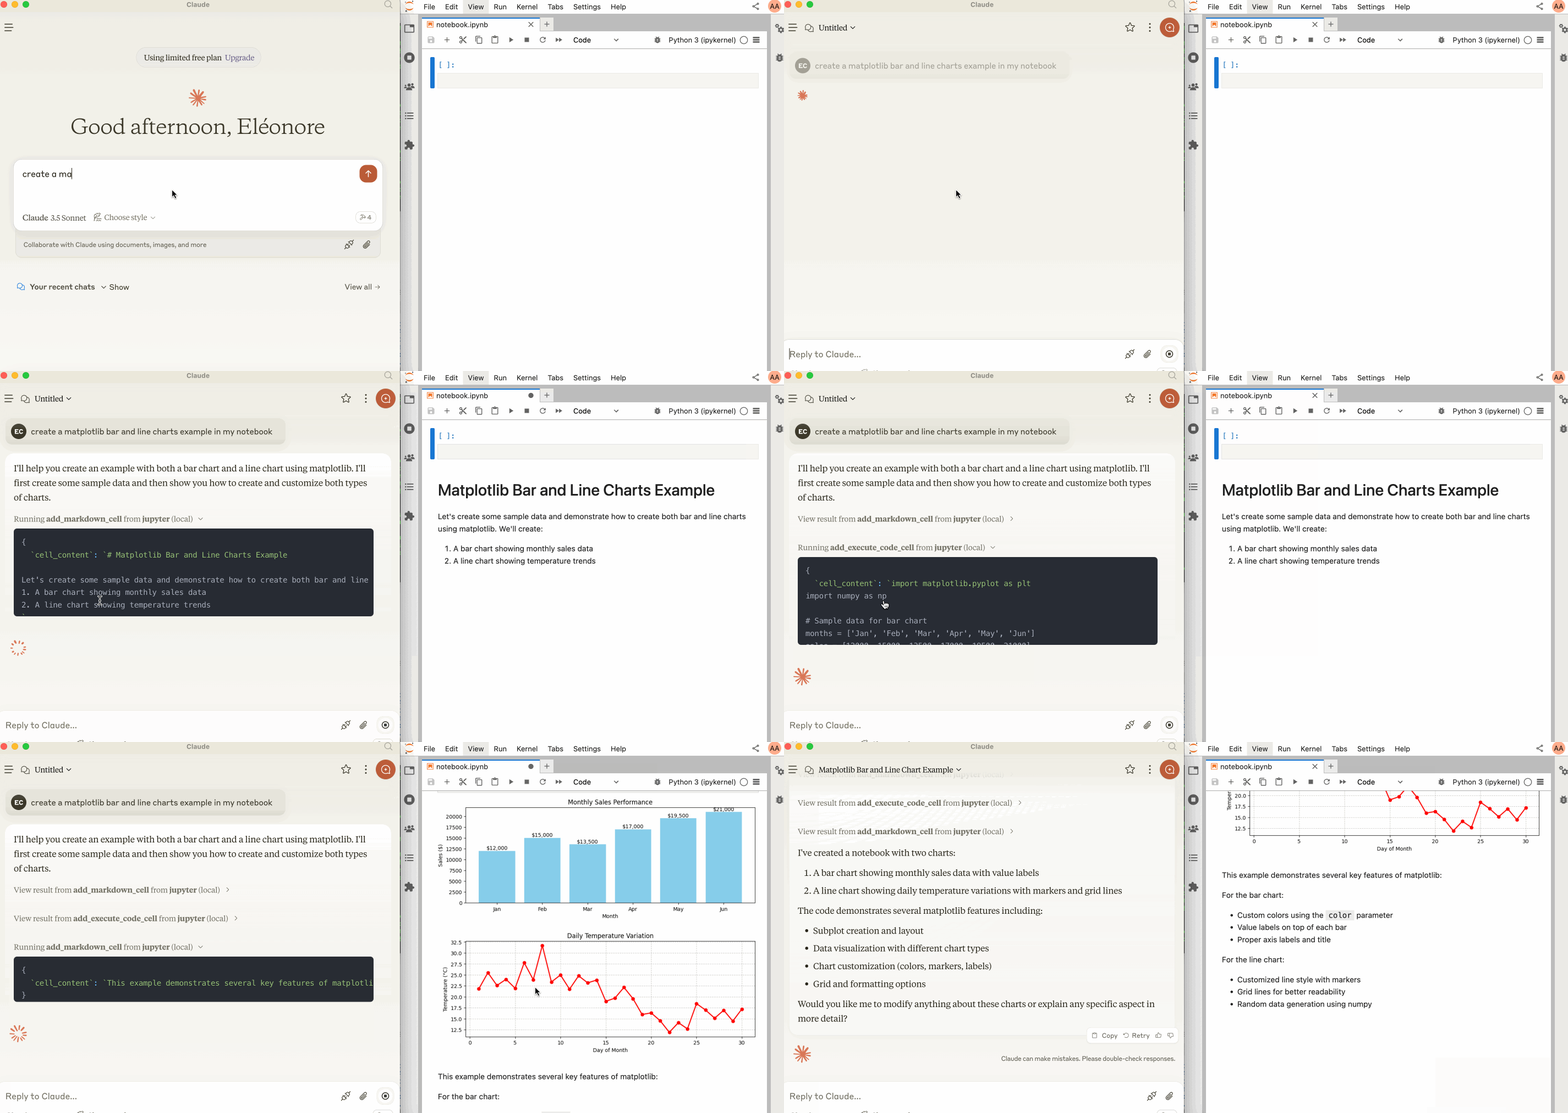
启动 JupyterLab
确保你已经安装了以下内容。协作包是必需的,因为通过 Jupyter 实时协作,可以在笔记本上看到所做的修改。
pip install jupyterlab jupyter-collaboration ipykernel
pip uninstall -y pycrdt datalayer_pycrdt
pip install datalayer_pycrdt
然后,使用以下命令启动 JupyterLab。
jupyter lab --port 8888 --IdentityProvider.token MY_TOKEN --ip 0.0.0.0
你也可以运行 make jupyterlab。
[!注意]
--ip设置为0.0.0.0以便允许在 Docker 容器中运行的 MCP 服务器访问你的本地 JupyterLab。
与 Claude 桌面版一起使用
Claude 桌面版可以从 这个页面 下载 macOS 和 Windows 版本。
对于 Linux,我们成功使用了基于 nix 的 非官方构建脚本。
# ⚠️ UNOFFICIAL
# You can also run `make claude-linux`
NIXPKGS_ALLOW_UNFREE=1 nix run github:k3d3/claude-desktop-linux-flake \
  --impure \
  --extra-experimental-features flakes \
  --extra-experimental-features nix-command
要与 Claude 桌面版一起使用,请将以下内容添加到你的 claude_desktop_config.json 中(更多详情请参阅 MCP 文档网站)。
[!重要]
确保
SERVER_URL和TOKEN的端口与jupyter lab命令中使用的相匹配。
NOTEBOOK_PATH应该相对于启动 JupyterLab 的目录。
macOS 和 Windows 上的 Claude 配置
{
  "mcpServers": {
    "jupyter": {
      "command": "docker",
      "args": [
        "run",
        "-i",
        "--rm",
        "-e",
        "SERVER_URL",
        "-e",
        "TOKEN",
        "-e",
        "NOTEBOOK_PATH",
        "datalayer/jupyter-mcp-server:latest"
      ],
      "env": {
        "SERVER_URL": "http://host.docker.internal:8888",
        "TOKEN": "MY_TOKEN",
        "NOTEBOOK_PATH": "notebook.ipynb"
      }
    }
  }
}
Linux 上的 Claude 配置
CLAUDE_CONFIG=${HOME}/.config/Claude/claude_desktop_config.json
cat <<EOF > $CLAUDE_CONFIG
{
  "mcpServers": {
    "jupyter": {
      "command": "docker",
      "args": [
        "run",
        "-i",
        "--rm",
        "-e",
        "SERVER_URL",
        "-e",
        "TOKEN",
        "-e",
        "NOTEBOOK_PATH",
        "--network=host",
        "datalayer/jupyter-mcp-server:latest"
      ],
      "env": {
        "SERVER_URL": "http://localhost:8888",
        "TOKEN": "MY_TOKEN",
        "NOTEBOOK_PATH": "notebook.ipynb"
      }
    }
  }
}
EOF
cat $CLAUDE_CONFIG
组件
工具
服务器目前提供 3 个工具:
add_execute_code_cell
- 在 Jupyter 笔记本中添加并执行一个代码单元格。
- 输入:
cell_content(字符串):要执行的代码。
- 返回:单元格输出。
add_markdown_cell
- 在 Jupyter 笔记本中添加一个 Markdown 单元格。
- 输入:
cell_content(字符串):Markdown 内容。
- 返回:成功消息。
-
download_earth_data_granules⚠️ 我们计划在未来将此工具迁移到单独的仓库,因为它特定于地理空间分析。
- 在 Jupyter 笔记本中添加一个代码单元格,用于从 NASA Earth Data 下载地球数据颗粒。
- 输入:
folder_name(字符串):用于保存数据的本地文件夹名称。short_name(字符串):要下载的地球数据集的简称。count(整数):要下载的数据颗粒数量。temporal(元组):(可选) 时间范围,格式为 (date_from, date_to)。bounding_box(元组):(可选) 边界框,格式为 (lower_left_lon, lower_left_lat, upper_right_lon, upper_right_lat)。
- 返回:单元格输出。
构建
您可以从源代码构建 Docker 镜像。
make build-docker
通过 Smithery 安装
要通过 Smithery 自动安装适用于 Claude Desktop 的 Jupyter MCP Server:
npx -y @smithery/cli install @datalayer/jupyter-mcp-server --client claude




